How to Login to WHM Panel & Install Node.js: A Complete Guide for Web Hosting Professionals
Table of Contents
- 1 How to Login to WHM Panel & Install Node.js: A Complete Guide for Web Hosting Professionals
- 2 Part 1: Securely Accessing Your WHM Panel
- 3 Part 2: Installing Node.js via EasyApache 4
- 4 Part 3: Configuring Node.js Selector in cPanel
- 5 Enabling Node.js Application Selector
- 6 Part 4: Creating and Managing Node.js Applications
- 7 Part 5: Optimizing Node.js for Production Hosting
- 8 Part 6: Troubleshooting Common Node.js Installation Issues
- 9 Part 7: Best Practices for Node.js Hosting
- 10 Conclusion
- 11 Frequently Asked Questions
- 12 How do I access my WHM panel securely?
- 13 How can I install Node.js on my WHM server?
- 14 What is the Node.js Application Selector in cPanel?
- 15 How do I optimize Node.js applications for production hosting?
- 16 What are common issues during Node.js installation and how to fix them?
In today’s competitive web hosting landscape, offering Node.js support to your clients can significantly expand your service portfolio. This comprehensive guide will walk you through the process of accessing your WHM (Web Host Manager) panel and installing Node.js, enabling you to provide cutting-edge JavaScript runtime environments for your customers. Whether you’re a seasoned hosting provider or just starting out, mastering these essential skills will enhance your service offerings and keep you ahead of the competition. By integrating Node.js into your hosting plans, you can attract developers and businesses looking for scalable, high-performance hosting solutions.
- Secure methods to access your WHM control panel
- Step-by-step Node.js installation through EasyApache 4
- Configuring Node.js Selector in cPanel Web Hosting
- Setting up and managing Node.js applications
- Troubleshooting common installation issues
- Best practices for Node.js hosting environments
Before diving into the technical steps, it’s important to understand why Node.js has become a crucial offering for web hosting companies. Node.js allows for server-side JavaScript execution, enabling developers to build fast, scalable network applications. By providing Node.js hosting, you can attract modern web developers who rely on this technology for creating real-time applications, APIs, and microservices.
Part 1: Securely Accessing Your WHM Panel
Finding Your WHM Access Point
The first step in managing your server is gaining secure access to the WHM interface. There are two primary methods to reach your WHM login page:
- Via IP Address: Navigate to https://your-server-ip:2087
- Via Hostname: Access through https://your-server-hostname/whm
Both methods utilize secure HTTPS connections to ensure your administrative credentials remain protected during transmission.
When accessing your WHM panel, always follow these security best practices:
- Use a modern, updated browser with strong TLS support
- Ensure your connection is secure (look for the padlock icon)
- Never access WHM from public or unsecured networks
- Consider implementing two-factor authentication for additional security
- Regularly update your root passwords with strong, unique credentials
If you encounter difficulties accessing your WHM panel, verify the following:
- Your server is online and responsive
- The correct port (2087) is open in your firewall settings
- Your SSL certificates are valid and not expired
- DNS is properly configured if using hostname access
- Your IP address hasn’t been blocked by security plugins
Part 2: Installing Node.js via EasyApache 4
Navigating to EasyApache 4 in WHM
Once successfully logged into WHM, you’ll need to utilize EasyApache 4 to install Node.js:
- In the WHM search bar, type “EasyApache 4” to quickly locate the tool
- Select “EasyApache 4” from the search results
- Review your current profile to ensure compatibility with Node.js
- Click on the “Customize” button next to your active profile
This process allows you to modify your server’s software stack without disrupting existing configurations.
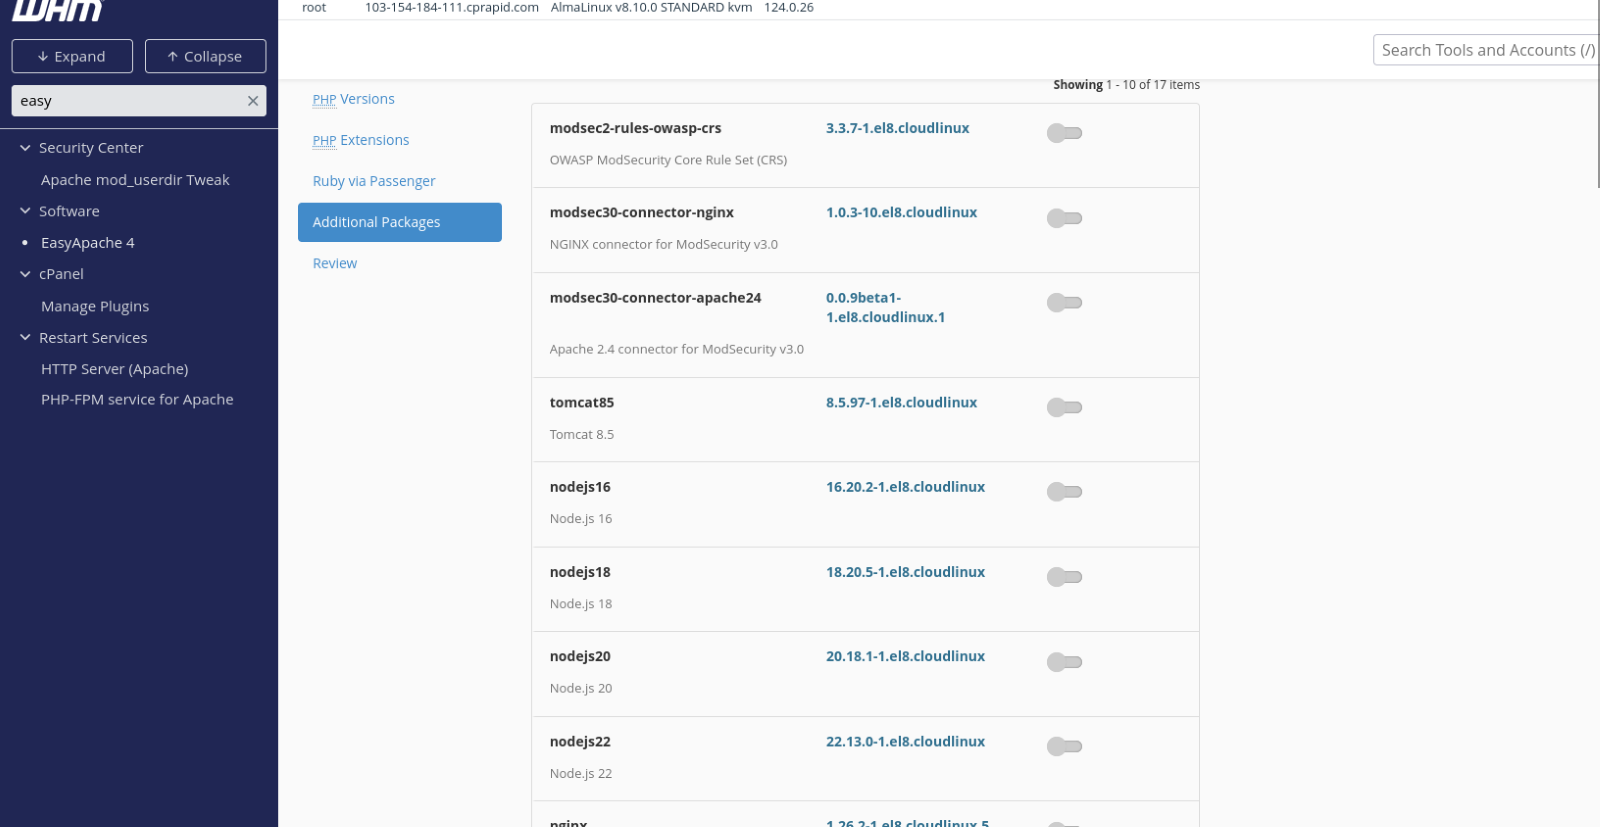
The key to a successful Node.js installation lies in properly selecting the package:
- Navigate to the “Additional Packages” section within EasyApache 4
- Scroll through the available packages or use the search function to find “Node.js”
- Click the checkbox next to Node.js to select it for installation
- Review any dependencies that will be automatically installed
- Consider selecting multiple Node.js versions to support diverse client needs
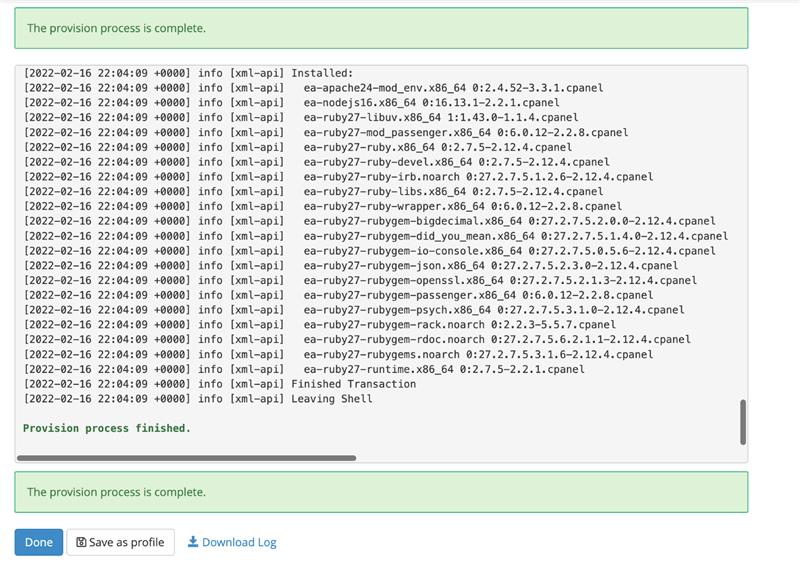
To finalize the Node.js installation:
- Review all selected packages and configurations
- Click the “Provision” button to begin the installation process
- Monitor the installation progress in real-time
- Wait for the confirmation message indicating successful installation
- Verify the installation by checking available Node.js versions
The entire installation process typically takes between 5-15 minutes, depending on your server specifications and existing configurations.
Part 3: Configuring Node.js Selector in cPanel
After successfully installing Node.js on your server, you’ll need to enable it for individual cPanel accounts:
- Log in to the specific cPanel account where Node.js will be used
- Use the search function at the top of the cPanel interface to find “Node.js”
- Click on the “Node.js Selector” icon that appears in the search results
This step is crucial for making Node.js available to your clients or specific hosting accounts.
Enabling Node.js Application Selector
The Node.js Application Selector must be enabled for each account:
- Look for the “Setup Node.js App” button
- Click “Enable” if prompted to activate the Node.js environment
- Wait for the system to configure the necessary environment variables
- Confirm the setup was successful when the application interface appears
This process creates the necessary user-level configurations to support Node.js applications.
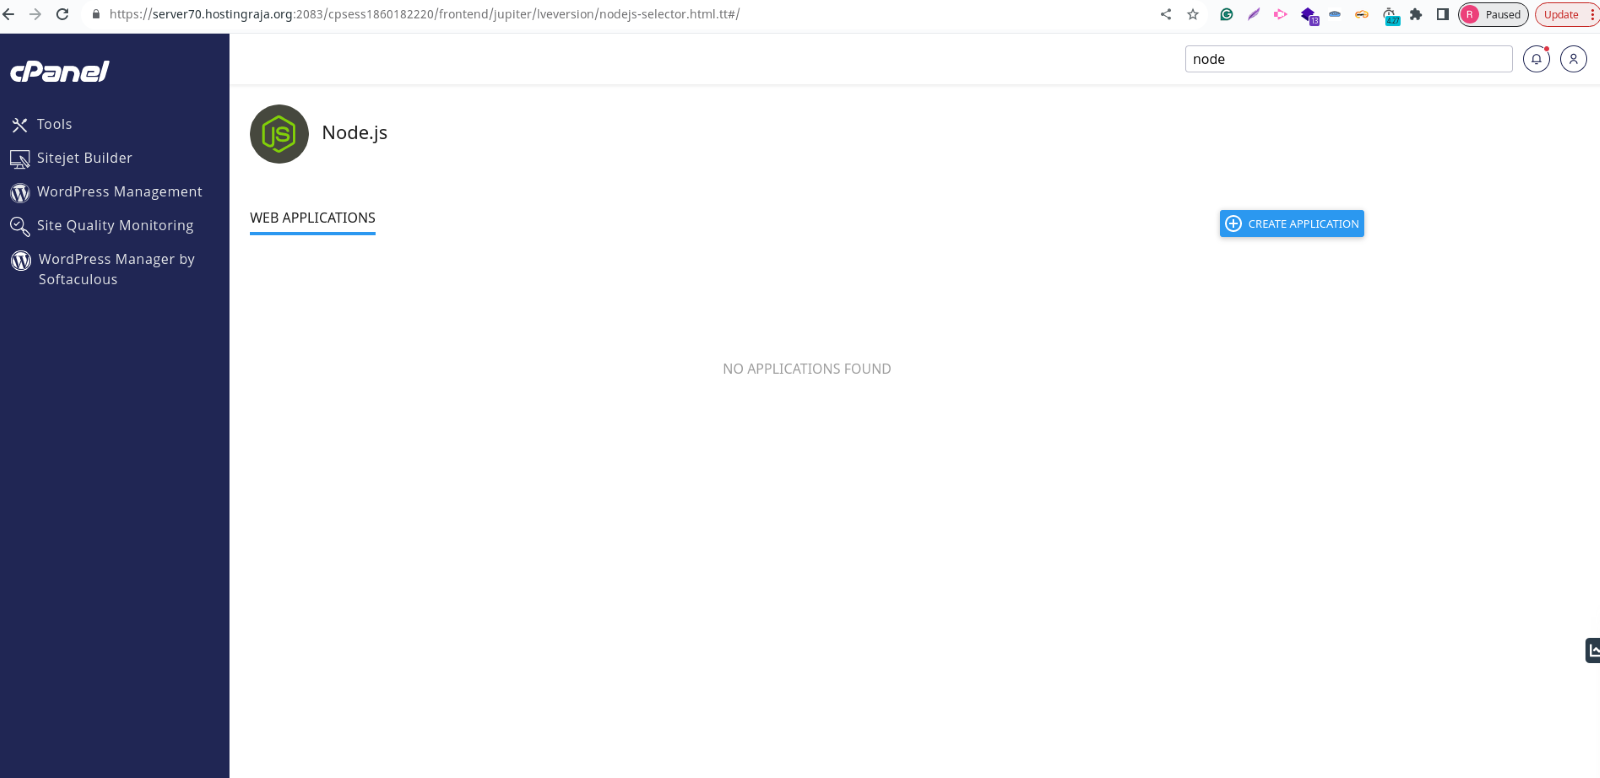
Part 4: Creating and Managing Node.js Applications
Once Node.js is enabled, you can create new applications:
- In the Node.js Selector interface, locate and click the “Create Application” button
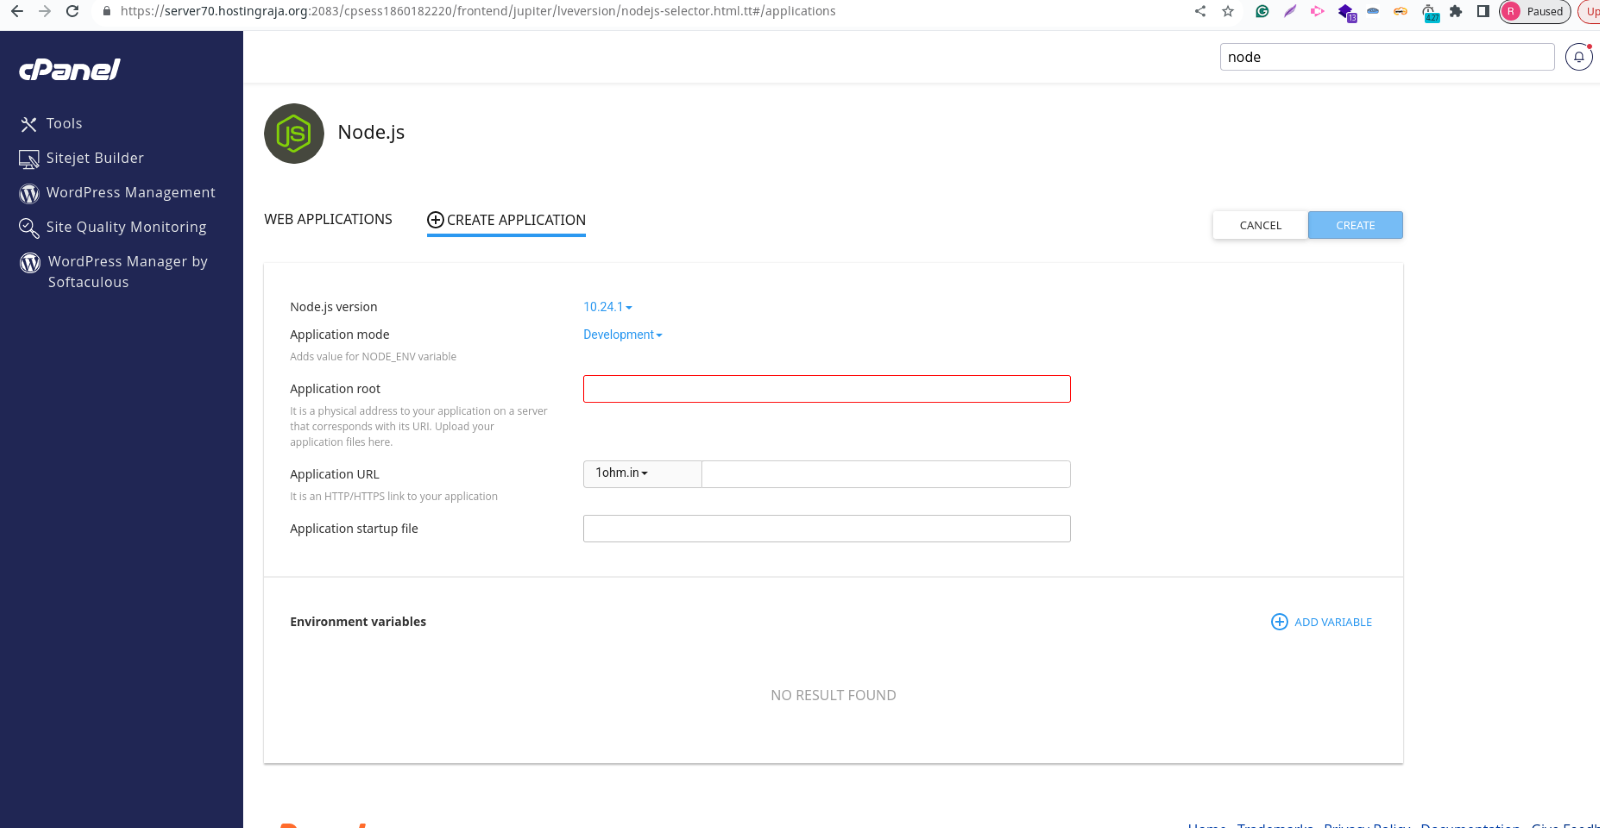
- Configure the following essential parameters:
- Select an appropriate Node.js version from the dropdown menu
- Choose between Development or Production application mode
- Specify the application root directory (typically within public_html)
- Set up the application URL (domain or subdomain)
- Define the startup file (e.g., app.js, server.js, or index.js)
- Click “Create” to establish the application environment
The choice between Development and Production modes is significant:
- Development Mode: Provides detailed error messages and logging, optimized for debugging and testing
- Production Mode: Focuses on performance and security, with minimal logging and optimized resource usage
Select the appropriate mode based on your client’s current development phase.
After creating the application, you’ll need to install its dependencies:
- Locate your application in the list and click the pencil (edit) icon
- In the application details page, find the “Run NPM Install” button
- Click this button to automatically install dependencies defined in package.json
- Monitor the installation process for any errors or warnings
- Verify successful installation when the process completes
This automated dependency management simplifies the deployment process for complex Node.js applications.
Part 5: Optimizing Node.js for Production Hosting
To ensure optimal performance for hosted Node.js applications:
- Return to the application edit page in Node.js Selector
- Adjust environment variables as needed for performance tuning
- Configure memory limits appropriate for your server resources
- Set up proper error logging and monitoring
- Implement process management to handle crashes and restarts
For production environments, implementing a reverse proxy is recommended:
- Configure Apache or Nginx as a reverse proxy for your Node.js applications
- Set up proper headers and SSL termination
- Implement caching strategies where appropriate
- Configure WebSocket support if required by the application
- Test the proxy configuration thoroughly before going live
Part 6: Troubleshooting Common Node.js Installation Issues
If your Node.js applications fail to start due to port conflicts:
- Check for existing processes using the same port (netstat -tulpn)
- Modify the application’s port in its configuration file
- Ensure proxy configurations are updated to reflect any port changes
- Restart the application after making changes
- Verify connectivity through the updated port
Permission issues are common when setting up Node.js environments:
- Verify that the application directories have the correct ownership (usually the cPanel user)
- Check file permissions, especially for executable files and scripts
- Ensure that Node.js has access to necessary system resources
- Review SELinux settings if applicable to your server
- Use sudo or similar elevation only when absolutely necessary
When NPM installations fail, follow these steps:
- Check the NPM error logs for specific failure reasons
- Verify internet connectivity from the server to NPM repositories
- Clear the NPM cache if corrupted (npm cache clean –force)
- Check for compatibility issues between package versions
- Ensure sufficient disk space for package installation
Part 7: Best Practices for Node.js Hosting
To maintain a healthy Node.js hosting environment:
- Regularly update Node.js to the latest stable versions
- Keep NPM updated to avoid security vulnerabilities
- Monitor for deprecated packages in client applications
- Schedule regular security audits (npm audit)
- Implement automated update notifications for critical packages
Effective monitoring ensures reliable hosting services:
- Implement application-level monitoring for performance metrics
- Set up alerts for unusual resource usage or errors
- Monitor memory leaks through periodic checks
- Track response times and throughput for client applications
- Utilize logging aggregation for easier troubleshooting
Conclusion
By following this comprehensive guide, you’ve learned how to securely access your WHM panel, install Node.js through EasyApache 4, configure the Node.js Selector in cPanel, and manage Node.js applications for your clients. These skills position your web hosting company to offer modern, competitive hosting solutions for developers working with JavaScript-based technologies.
Remember that staying current with Node.js developments and best practices is crucial for maintaining a competitive edge in the web hosting industry. Regularly review your configurations, keep your Node.js installations updated, and continuously optimize your hosting environment to provide the best possible service to your clients.
By offering robust Node.js hosting capabilities, you can attract forward-thinking developers and businesses looking to leverage this powerful technology for their web applications, APIs, and microservices.
Frequently Asked Questions
How do I access my WHM panel securely?
You can access WHM via https://your-server-ip:2087 or https://your-server-hostname/whm. Always use a secure connection, enable two-factor authentication, and avoid logging in from public networks to protect your credentials.
How can I install Node.js on my WHM server?
Log in to WHM, search for EasyApache 4, and customize your active profile. In the “Additional Packages” section, select Node.js, review dependencies, and click Provision to complete the installation.
What is the Node.js Application Selector in cPanel?
The Node.js Application Selector lets you create and manage Node.js apps for individual cPanel accounts. You can set the Node.js version, application mode, root directory, URL, and startup file through a simple interface.
How do I optimize Node.js applications for production hosting?
Use production mode, configure environment variables for performance, set memory limits, enable proper logging, and set up a reverse proxy with Apache or Nginx to handle SSL, caching, and WebSockets efficiently.
What are common issues during Node.js installation and how to fix them?
Common issues include port conflicts, permission errors, and failed NPM installs. Check for occupied ports, correct file ownership and permissions, clear NPM cache, ensure internet connectivity, and verify package compatibility.
-

KINGSTON AJITH
Senior Content Writer @ HostingRajaA seasoned Senior Content Writer with over 5 years of experience in the tech industry, specializing in web hosting. Passionate about creating unique, high-quality content for articles, blogs, and web pages. As a dedicated learner, continually improving writing skills and overseeing all online content and communications to ensure quality and consistency.